为什么要做项目规范
-
提高代码质量:项目开发规范能确保代码的一致性和可读性,使其他程序员能够更容易地理解和维护代码。同时,规范也能减少代码中的错误和缺陷,提高软件的整体质量。 -
加强团队协作:在团队开发项目中,不同的程序员可能采用不同的编程风格和习惯。通过遵循统一的开发规范,团队成员可以更加高效地协作,减少沟通成本和误解,从而加快项目进度。 -
降低维护成本:项目开发规范有助于建立清晰的代码结构和文档,使得软件系统的维护和升级变得更加容易。规范化的代码结构还便于进行代码审查和测试,进一步降低维护成本。 -
提升软件可靠性:遵循项目开发规范可以减少代码中的潜在问题,提高软件的稳定性和可靠性。例如,规范中的错误处理机制、代码复用和模块化等原则都有助于提升软件的整体性能。 -
促进项目管理:项目开发规范有助于项目经理更好地管理项目进度和资源。通过制定明确的任务划分、版本控制和文档要求等规范,项目经理可以更加有效地监控项目进度,确保项目按时按质完成。
工具介绍
-
Eslint:一个静态代码分析工具,可以帮助开发者检查代码存在的语法问题,编码风格和潜在问题,并提供修复方式。
-
Prettier:一个代码格式化工具,可以通过自定义规则来重新规范项目中的代码,去掉原始的代码风格,确保团队的代码使用统一相同的格式。
-
Stylelint:一个用于检测 CSS 代码中潜在问题和风格错误的工具。它可以帮助我们规避 CSS 上的一些错误和风格的统一。
-
Husky:一个 Git Hook 工具,自动检测提交消息、代码,并在提交或推送时运行测试。
-
Lint-staged:一个基于Node.js的库,它可以对Git仓库中的暂存区(staged)代码进行线性检测,从而确保代码质量。
-
Commitlint:项目 commit 提交风格规范。
安装 Eslint
- Nuxt3 中是使用 @nuxt/eslint-config 进行代码检查和格式化,执行安装命令:
pnpm add -D eslint @nuxt/eslint-config- 配置 .eslintrc.cjs 文件,具体配置请参考Eslint 配置规则:
module.exports = {
  root: true,
  env: {
    browser: true, // 支持浏览器环境的检测
    es2021: true, // 支持es2021语法的检测
    node: true, // 支持node环境的检测
  },
  extends: ["@nuxt/eslint-config"],
  overrides: [],
  parserOptions: {
    ecmaVersion: "latest", // 解析文件的时候使用最新的ecmaVersion
    sourceType: "module", // 文件是ES6模块规范
  },
  plugins: ["vue"],
  rules: {
    camelcase: 2, // 驼峰
    indent: [2, 2], // 缩进2个空格
    semi: [2, "never"], // 要求或禁止使用分号代替 ASI,即禁用行尾使用分号
    quotes: ["error", "single"], // 强制使用一致的反勾号、双引号或单引号
    "no-debugger": 2, // 不能debugg
    "no-empty": 2, // 块语句中的内容不能为空
    "no-extra-parens": 2, // 禁止非必要的括号
    "no-extra-semi": 2, // 禁止多余的冒号
    "comma-dangle": [2, "never"], // 键值对最后一个不能有,
    "spaced-comment": ["error", "always"], // 注释必须空格
  },
};{
"editor.codeActionsOnSave": {
"source.fixAll": false,
"source.fixAll.eslint": true
}
}- 效果
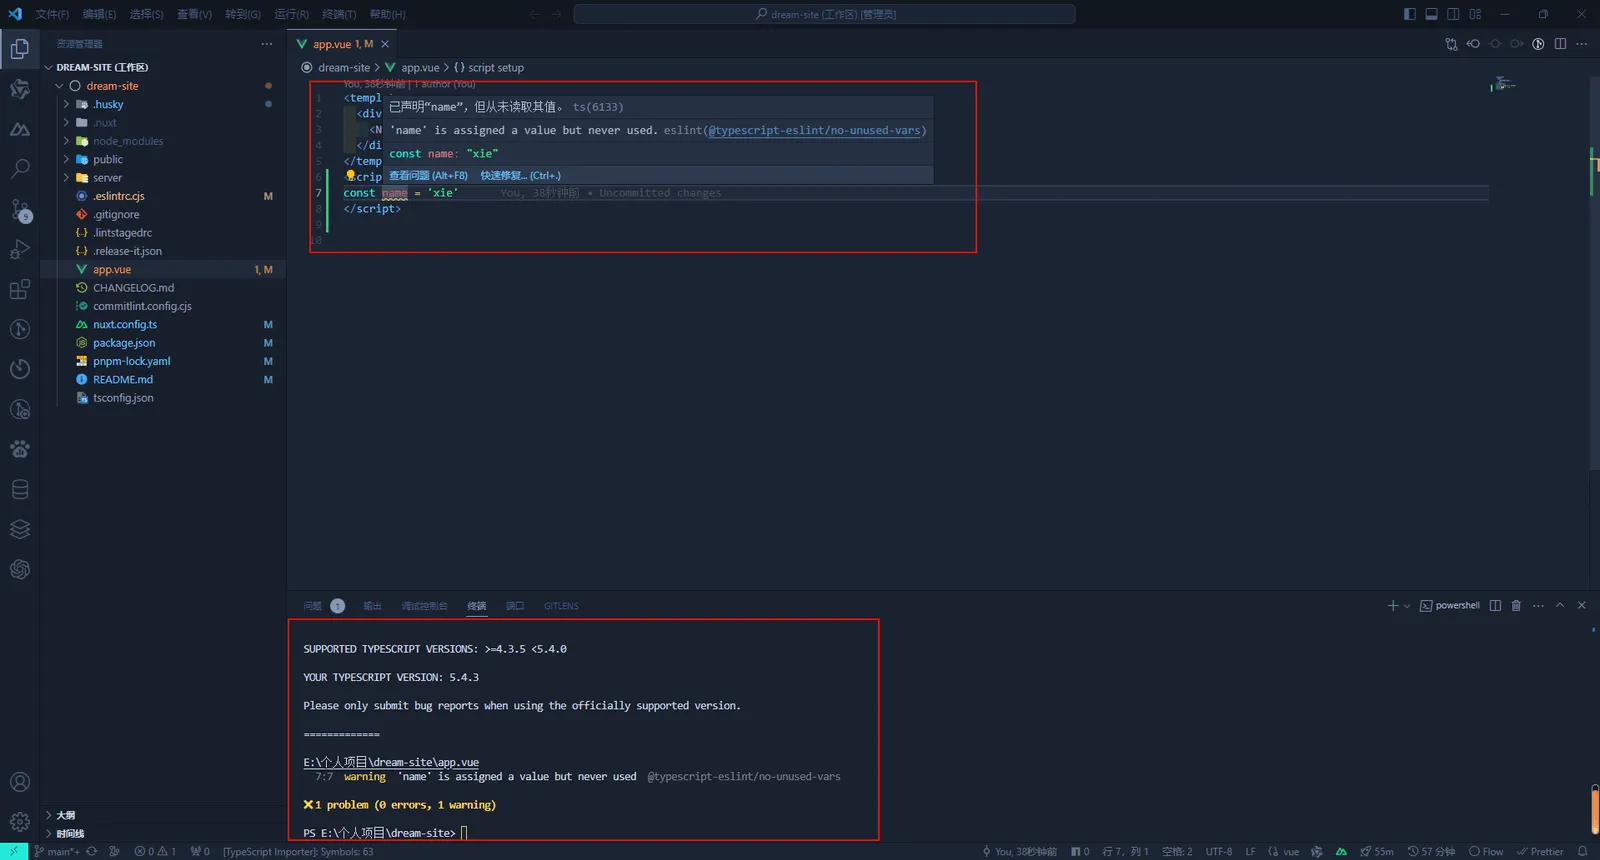
由于 ESLint 已经配置了代码格式化,所以没有必要使用 Prettier 来重复这个功能。要格式化代码,你可以运行 yarn lint —fix、pnpm lint —fix 或 bun run lint —fix,或者参考 ESLint 部分中的 IDE 设置。
如果你的编辑器中安装了 Prettier,请在项目中工作时禁用它,以避免冲突。
注意:我们正在讨论在将来启用 Prettier。
配置 Stylelint
- 执行安装命令
pnpm add stylelint @nuxtjs/stylelint-module stylelint-config-standard stylelint-order stylelint-config-recommended-vue -D- 配置 nuxt.config.ts:
modules: [
  // Simple usage
  '@nuxtjs/stylelint-module',

  // With options
  ['@nuxtjs/stylelint-module', { /* module options */ }]
]- 新增 .stylelintrc.cjs 文件,具体配置请参考Stylelint 配置:
module.exports = {
  extends: ["stylelint-config-standard", "stylelint-config-recommended-vue"], // 这里保证 stylelint-config-recommended-vue 放在最后,不然 vue 文件会报错
  plugins: ["stylelint-order"],
  rules: {
    // 颜色指定大写
    "color-hex-case": "upper",
    // 禁止空块
    "block-no-empty": true,
    // 颜色6位长度
    "color-hex-length": "long",
    // 兼容自定义标签名
    "selector-type-no-unknown": [
      true,
      {
        ignoreTypes: [],
      },
    ],
    // 忽略伪类选择器 ::v-deep
    "selector-pseudo-element-no-unknown": [
      true,
      {
        ignorePseudoElements: ["v-deep"],
      },
    ],
    // 禁止低优先级的选择器出现在高优先级的选择器之后。
    "no-descending-specificity": null,
    // 不验证@未知的名字,为了兼容scss的函数
    "at-rule-no-unknown": null,
    // 禁止空注释
    "comment-no-empty": true,
    // 禁止简写属性的冗余值
    "shorthand-property-no-redundant-values": true,
    // 禁止值的浏览器引擎前缀
    "value-no-vendor-prefix": true,
    // property-no-vendor-prefix
    "property-no-vendor-prefix": true,
    // 禁止小于 1 的小数有一个前导零
    "number-leading-zero": "never",
    // 禁止空第一行
    "no-empty-first-line": true,
    // 属性的排序
    "order/properties-order": [
      "position",
      "top",
      "right",
      "bottom",
      "left",
      "z-index",
      "display",
      "justify-content",
      "align-items",
      "float",
      "clear",
      "overflow",
      "overflow-x",
      "overflow-y",
      "margin",
      "margin-top",
      "margin-right",
      "margin-bottom",
      "margin-left",
      "border",
      "border-style",
      "border-width",
      "border-color",
      "border-top",
      "border-top-style",
      "border-top-width",
      "border-top-color",
      "border-right",
      "border-right-style",
      "border-right-width",
      "border-right-color",
      "border-bottom",
      "border-bottom-style",
      "border-bottom-width",
      "border-bottom-color",
      "border-left",
      "border-left-style",
      "border-left-width",
      "border-left-color",
      "border-radius",
      "padding",
      "padding-top",
      "padding-right",
      "padding-bottom",
      "padding-left",
      "width",
      "min-width",
      "max-width",
      "height",
      "min-height",
      "max-height",
      "font-size",
      "font-family",
      "font-weight",
      "text-align",
      "text-justify",
      "text-indent",
      "text-overflow",
      "text-decoration",
      "white-space",
      "color",
      "background",
      "background-position",
      "background-repeat",
      "background-size",
      "background-color",
      "background-clip",
      "opacity",
      "filter",
      "list-style",
      "outline",
      "visibility",
      "box-shadow",
      "text-shadow",
      "resize",
      "transition",
    ],
  },
};- 向 package.json 的 scripts 中添加命令:
"lint:style": "stylelint src/**/*.{css,less,vue} --fix", // 这里记得修改 nuxt.config.ts 的 srcDir 值为 'src/'stylelint 的坑比较多,如果大家在配置后发现不生效,可以自行百度解决一下。
配置 Husky
- 执行安装命令
pnpm add husky -D- 初始化脚本
pnpm exec husky init完成之后会在根目录生成一个 .husky 文件夹。
配置 Lint-staged
- 执行安装命令
pnpm add lint-staged -D- 向 package.json 的 scripts 中添加命令:
"pre-commit": "lint-staged"- 可以根据项目需要在 package.json 中添加配置,或者根目录新建 .lintstagedrc 配置文件:
{
  "lint-staged": {
    "*.{js,jsx,vue,ts,tsx}": ["eslint --fix", "prettier --write"]
  }
}- 将 .husky/pre-commit 脚本的内容改为:
npm run pre-commit配置完成后,这样当我们每次执行 git 命令的时候就会去检查暂存区的文件,有语法错误就会提示。
配置 Commitlint
- 执行安装命令
pnpm add @commitlint/config-conventional @commitlint/cli -D- 根目录添加 commitlint.config.cjs 配置文件:
module.exports = {
  extends: ["@commitlint/config-conventional"],
  rules: {
    "type-enum": [
      // type枚举
      2,
      "always",
      [
        "build", // 编译相关的修改,例如发布版本、对项目构建或者依赖的改动
        "feat", // 新功能
        "fix", // 修补bug
        "docs", // 文档修改
        "style", // 代码格式修改, 注意不是 css 修改
        "refactor", // 重构
        "perf", // 优化相关,比如提升性能、体验
        "test", // 测试用例修改
        "revert", // 代码回滚
        "ci", // 持续集成修改
        "config", // 配置修改
        "chore", // 其他改动
      ],
    ],
    "type-empty": [2, "never"], // never: type不能为空; always: type必须为空
    "type-case": [0, "always", "lower-case"], // type必须小写,upper-case大写,camel-case小驼峰,kebab-case短横线,pascal-case大驼峰,等等
    "scope-empty": [0],
    "scope-case": [0],
    "subject-empty": [2, "never"], // subject不能为空
    "subject-case": [0],
    "subject-full-stop": [0, "never", "."], // subject以.为结束标记
    "header-max-length": [2, "always", 72], // header最长72
    "body-leading-blank": [0], // body换行
    "footer-leading-blank": [0, "always"], // footer以空行开头
  },
};- 向 package.json 的 scripts 中添加命令:
{
  "scripts": {
    "commitlint": "commitlint --config commitlint.config.cjs -e -V"
  }
}- 新增 .husky/commit-msg 配置文件:
npx husky add .husky/commit-msg加入配置:
npm run commitlint在我们每次提交 commit 的时候,就会帮我们检查提交风格是否符合规范。
评论